GREN-Map-DB-Node
Importing and Polling
A GREN Map DB server uses the polling mechanism to obtain topology data from peers.
Servers can also receive data passively through the grenml_import API.
How the Polling Mechanism Works
The Scheduling Service
To maintain scheduled tasks, Django Q is used. Django-Q supports scheduled cron style tasks. The crontab format support is provided by Croniter.
Triggering Polling
The Django polling application provides an endpoint under polling/trigger. This endpoint is used for triggering the task of collecting and aggregating the data from all of the registered GRENML sources whenever it is called with a GET request.
This endpoint is blocked from external access by websp and is triggered whenever a polling task is scheduled to occur.
This endpoint should never be accessible outside of the container.
Synchronising the Scheduler with Django
When the Django Docker container is started, the “setuppolling” command is triggered on the manage.py for the django application. This command will use the setting stored in the setting table for the polling schedule to create the polling task on the scheduling service. If the schedule is modified from Django Admin, a pre save hook will trigger an update to synchronize the job on the scheduler with the new value submitted to the Django Admin.
Token
The polling source node needs to create a token with “Token related app” pointing to “Collecting Token For External Use”. The polling node will use this token to poll it.
The Database Table
Located in django/polling/models/polling.py, the table PollingSources contains all the database fields used for the polling mechanism. A number of these values are set up with defaults and should rarely, if ever, be updated. The fields are listed below:
- Name: A name the user assigns that connection for easy management
- Protocol: The protocol to use when connecting with the source. It should be kept as HTTPS for production.
- Hostname: The hostname the user sets to connect with the polling source
- Port: The port to connect to. Can be changed for debugging/development reasons, but for production purposes it should be kept at 443.
- Path: The URL path to get to the node, if any. Must be formatted with word characters ended with a slash.
- Active: A boolean that identifies whether the source is active and should be polled
- Token: The Collecting Token provided by the administrator of the polling source node
- _status_path: A read-only entry that is attached to the URL to create the path to the Status Endpoint on other nodes
- _polling_path: A read-only entry that is attached to the URL to create the path that the polling mechanism will use to collect data from the polling sources
Network Data Endpoints
Nodes respond to requests pointed at /grenml_export/ with all the network data they currently have.
The response for requests to /published_network_data/current/collect/ will be a snapshot of the database.
The response for requests to grenml_export/map_data/ will be the data format chosen by the data source administrator (Live or Published Data).
Here are examples of curl commands you can use to access these endpoints. Notice the token header. A node running in production mode will respond with 403 if the token is missing or invalid.
# Endpoint that returns all network data:
curl localhost/grenml_export/ > /dev/null

# Test endpoint for all network data - request with token:
curl -H "Authorization: Bearer svCDEovBvue1Jx50IIArd8NCOWn66ZSn" \
localhost/test/grenml_export/ > /dev/null

# Endpoint for the database snapshot:
curl -X POST localhost/published_network_data/current/collect/ > /dev/null

# Test endpoint for snapshot - request with token:
curl -H "Authorization: Bearer svCDEovBvue1Jx50IIArd8NCOWn66ZSn" -X POST \
localhost/published_network_data/current/test/collect/ > /dev/null
API
There is a set of HTTP APIs (some of which follow REST conventions) in the polling app to support automated functional tests. It is not recommended to use this publicly in production. Should this be desired, a robust review should take place and exhaustive functional tests be applied.
Sandbox
Polling is disabled when the value of the SANDBOX environment variable is one.
The place to look for the variable’s definition is the env directory, in the file that corresponds to the type of deployment in use: .env.dev for development, .env.prod for production and so on.
Observe Polling between Nodes Deployed on the Same Host
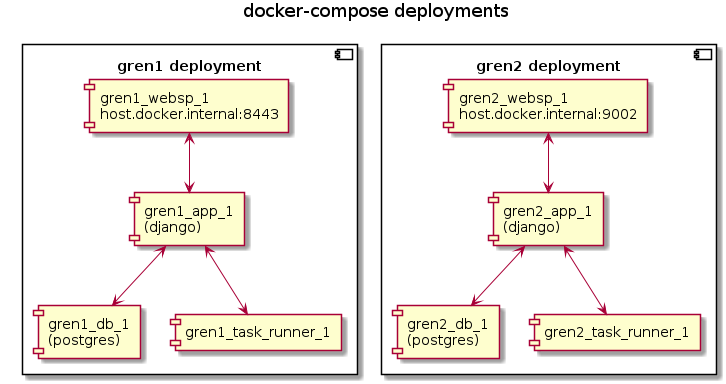
It is possible to deploy two GREN nodes on the same host by calling docker-compose on separate terminals. We can then configure one of the nodes to poll from the other.
Steps
-
If you haven’t done so, follow the instruction in SSO Document to set up your environment for one IdP and two or more MAP nodes.
-
Use the commands below on different terminals to start two GREN nodes called gren1 and gren2. The websp container on gren1 will bind to the host’s port $MAP1_HOST_PORT. The second websp container will bind to port $MAP2_HOST_PORT.
docker-compose -f docker-compose.idp.yml up --build
docker-compose -f docker-compose.yml -f docker-compose.dev.yml -p gren1 up --build
docker-compose -f docker-compose.yml -f docker-compose.dev2.yml -p gren2 up
The command line option -p specifies a prefix that Docker appends to the names of the containers in each deployment.
Once the compose commands complete, we will have two nodes as pictured in the diagram below.
If you need the third node, create the needed docker-compose.dev3.yml, start it like:
docker-compose -f docker-compose.yml -f docker-compose.dev3.yml -p gren3 up
For more nodes, repeat the step above for each node.
-
Open the second node’s admin page by navigating to
https://${MAP2_HOST_NAME}:${MAP2_HOST_PORT}/admin/and import a topology file.3.1. Create a published-network-data item that will contain the topology now present in the database. In the main admin page, click on “Published network data”, then on “Add published network data”, provide a name for the item and a description. Press “Save”.
3.2. Import another topology file to create a difference between the database and the “published network” snapshot.
-
Open the first node’s admin page at
https://${MAP1_HOST_NAME}:${MAP1_HOST_PORT}/admin/and configure polling sources as follows:4.1. Navigate to new polling source page, using the URL
https://${MAP1_HOST_NAME}:${MAP1_HOST_PORT}/admin/polling/pollingsource/add/or by clicking on “GRENML Polling Sources”, then on “Add GRENML Polling Source”.- To get the data from the database of the node that provides the data (second node), use this example:
(Suggested) Name: node2-database Protocol: HTTP Host Name: host.docker.internal (This is for Mac and Windows. For Linux, use "172.17.0.1" or "localhost") Port: 8001 Path: leave empty - To get the published network data from the node providing the data (second node), use this example:
(Suggested) Name: node2-published
Protocol: HTTP
Host Name: host.docker.internal (This is for Mac and Windows. For Linux, use "172.17.0.1" or "localhost")
Port: 8001
Path: published_network_data/current/
The slash character at the end of the path is required.
(Suggested) Name: node2-database
Protocol: HTTPS
Host Name: host.docker.internal (This is for Mac and Windows. For Linux, use "172.17.0.1" or "localhost")
Port: ${MAP2_HOST_PORT}
Path: leave empty
In this case, the data source administrator must choose the data format to be provided in ‘Base App’ > ‘App Configuration Settings’ > GRENML Polling Data Supply Type. Only the values: ‘Live’ or ‘Published’ are accepted.
(Suggested) Name: node2-published
Protocol: HTTPS
Host Name: host.docker.internal (This is for Mac and Windows. For Linux, use "172.17.0.1" or "localhost")
Port: ${MAP2_HOST_PORT}
Path: published_network_data/current/
The slash character at the end of the path is required.
- To get the data from the database of the node that provides the data (second node), use this example:
-
Use the “Test Connection” buttons beside each source to verify the first node can connect to the second. Use the “Collect GRENML Data” button to poll from the associated source.
- Polling “node2-database” should bring the topologies from the two files we imported on the second node.
- Polling the “node2-published” source should transfer only the contents of the first file imported.
- Polling the “node2-database-or-published” source should transfer the content according to what was defined as in the ‘GRENML Polling Data Supply Type’ field by the administrator of the node that will supply the data. If the set value was:
- ‘Live’: Polling should bring the topologies from the two files we imported on the second node.
- ‘Published’ Polling the source should transfer only the contents of the first file imported.
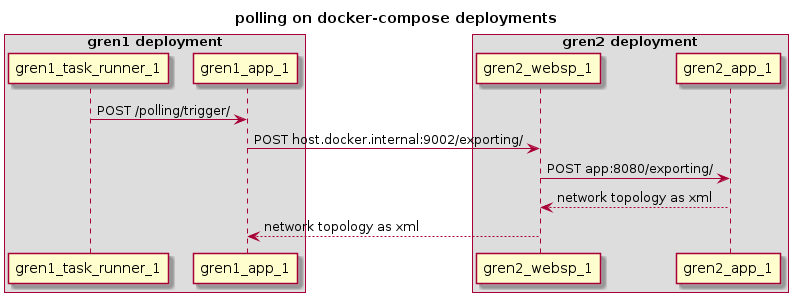
The diagram above illustrates polling the endpoint that responds with the information from the node’s entire database.
Delete Propagation
An XML file generated by a GREN Map server only describes what exists in the server. There is no information about changes in the database.
A network element deleted from a server by its administrator disappears from the file it exports. The mechanism responsible for removing this element from the database of a server that receives the file is located in the module grenml_import.utils.delete_propagation, used by grenml_import.importer.GRENMLImporter.
The database handling done in the server is the same regardless of the file’s origin: another server, the admin page or an API request.
When the server finds in the database an institution, link, node or topology that is associated to one of the topologies in the file to be imported, it marks this object as “dirty”. When the object exists in the file, the server will update it and remove the mark. If it doesn’t exist, the server will first remove the association between it and the topology in the file. The server then deletes the objects that are not associated to any topologies.
The reason for breaking the associations before deleting is to correctly import a file in which an object exists in a child topology but disappears from one of its ancestors. Topologies form a tree: a topology has a reference to its parent. The XML file contains a tree of topologies (there will often be only one though). To import a file, the server visits each of the topologies in it. The server processes institutions, links and nodes from the bottom of the tree to the top: the objects in the leaves of the tree are handled before the objects in the topologies that have children.
Institutions, links and nodes have properties. When the import function visits one of the file’s topologies, it will gather the objects of a type, process them individually, then update the properties for all objects at once. A situation like the one described above involving child and parent topologies would happen with properties if the server updated them at every object: one network element appearing in several topologies would lose the properties in the instances processed before the last one.
There are test cases that represent these problems in the modules shared_object and shared_object_with_properties at grenml_import/test/test_delete_propagation.